A cold floor can make an otherwise comfortable room feel unpleasant. You might have reliable heating, insulated walls, and well-fitted windows, yet still notice chilly air around your feet. In many older properties, the reason is hidden beneath the floorboards. Suspended timber floors often contain an open space below their joists, allowing cold air to circulate beneath the rooms.
Improving this type of floor requires more than placing insulation between wooden supports. The arrangement of the layers, the condition of the timber, the movement of moisture, and the treatment of draught paths all influence the result. A carefully planned floor insulation joist layering system can reduce heat loss while protecting the structure that supports the floor.
The objective is to create a continuous thermal barrier without trapping moisture or blocking ventilation that the building needs. This balance is particularly important in Victorian and Edwardian homes, where suspended timber floors are common.
How Suspended Floors Transfer Heat and Air
A suspended timber floor normally consists of floorboards fixed to horizontal timber joists. These joists rest on supporting walls or other structural elements, leaving a void between the underside of the floor and the ground.
Outside air often enters this void through ventilation bricks or air vents in the external walls. The airflow helps remove moisture and keeps the underside of the timber dry. However, it can also make the floor above colder, particularly when gaps exist between individual boards.
Heat moves through the floor by conduction, while uncontrolled air movement can increase the feeling of coldness. These are related but different problems. Insulation slows heat transfer through the floor structure, whereas draught proofing reduces unwanted air movement through gaps.
A successful project addresses both without confusing the two. The room should become more airtight, but the subfloor void must retain its designed ventilation.
The Role of Joists, Floorboards, and the Subfloor Void
Joists are not simply supports for insulation. They are structural components that carry the floor’s weight, and their condition determines whether additional work can proceed safely.
Before choosing a build-up, inspect the joists for softness, discoloration, fungal growth, insect damage, and signs of persistent dampness. Check the wall plates and supporting areas as well. Insulation should never be used to conceal an existing moisture problem.
The subfloor void also deserves attention. Its depth, ventilation openings, ground condition, and accessibility affect the installation method. A shallow void may make work from below difficult, while a cellar can provide convenient access without removing every floorboard.
Planning an Insulation Build-Up That Fits the Joists
The best floor insulation joist layering arrangement depends on the dimensions and condition of the existing floor. There is no single thickness or material that suits every building. A deep joist space offers more flexibility than a shallow one, but the installer must still consider ventilation, fixing methods, and the position of pipes and cables.
Start by measuring the joists at several points. Older floors are not always level or consistent. Some joists may have been replaced, repaired, or altered during previous renovations. Measuring only one section can lead to an unsuitable insulation specification.
Measuring Joist Depth and Available Insulation Space
Joist depth determines how much insulation can fit between the structural members. However, filling every millimetre is not automatically the correct approach. The required arrangement may include space for supporting materials, a membrane, or other components depending on the design.
For example, a mineral wool batt fitted between joists needs suitable support so it remains in position. If it is pushed too tightly into a shallow cavity, compression can reduce its effective thermal performance. If it is cut too small, gaps may allow cold air to bypass the insulation.
Rigid insulation boards require accurate measurements too. Each piece should fit closely between the joists, with joints and edges treated according to the manufacturer’s installation instructions. Irregular gaps should not be left open and assumed to be harmless.
The installer should also check the location of electrical cables, pipework, recessed fittings, and other services. Insulation must not create unsafe conditions around electrical equipment or interfere with access to components that require maintenance.
Choosing Between Installation From Above and Below
When there is an accessible cellar or crawl space, insulation can often be installed from underneath. This approach avoids disturbing finished flooring and can reduce the risk of damaging original floorboards.
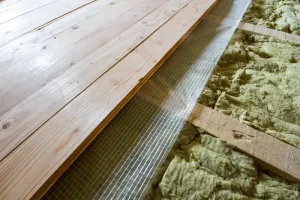
Insulation batts may be fitted between the joists and supported with suitable netting, battens, or a designed retaining system. Rigid boards can also be installed where the joist arrangement and product specification allow it.
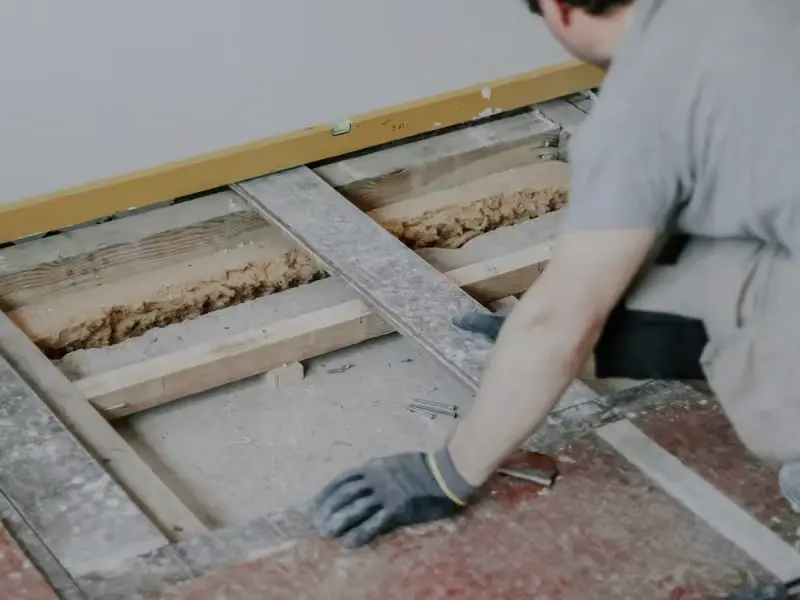
Working from above is another option. Floorboards are carefully lifted so the installer can reach the spaces between joists. This method can be useful where the subfloor void is too shallow for safe access or where the floor is already being renovated.
Older boards may split when removed, especially if they have been nailed repeatedly or have become brittle. Their original positions should be recorded so they can be replaced accurately. Historic floors may need specialist handling to preserve their appearance and structural character.
Supporting Insulation Without Compressing It
Insulation must remain in its intended position throughout the life of the floor. Unsupported material can sag, move, or develop gaps, particularly when exposed to air movement beneath the building.
A suitable support system keeps the insulation in contact with the intended boundaries without squeezing it. The correct arrangement depends on the insulation product, joist spacing, and manufacturer’s instructions.
The underside may also need a suitable protective or air-control layer. This should be selected as part of the complete floor design rather than added automatically. A poorly chosen impermeable layer can restrict drying and create moisture problems.
The important principle is continuity. Insulation should remain evenly distributed between the joists, with no loose sections, large gaps, or compressed areas that undermine the design.
Creating a Continuous Thermal Layer Across the Floor
Even good insulation can perform poorly when the thermal layer is interrupted. A small uninsulated strip beside an external wall, for example, may allow heat to escape around the edge of the floor.
This is why floor insulation joist layering needs to account for the whole floor assembly rather than just the spaces between the joists. The perimeter, supporting walls, service openings, and junctions with neighbouring structures all matter.
Managing Gaps Around Joists and Perimeter Edges
The floor perimeter is one of the most important areas to inspect. Gaps can occur where floorboards meet skirting boards, where joists meet external walls, and around pipework entering the room.
These openings can create noticeable draughts even when the main insulation layer is correctly fitted. Appropriate flexible sealants or other compatible airtightness products may be used at room-side gaps, depending on the materials and movement expected.
Care is needed around older masonry and timber junctions. A modern sealant should not be applied blindly to a historic detail that needs to manage moisture or movement. The aim is to control unwanted air leakage while allowing the building fabric to behave as intended.
Addressing Thermal Bridging Through Timber
Timber joists conduct heat more readily than many insulation products. As a result, heat can travel through the joists even when the spaces between them are insulated.
This effect is known as thermal bridging. It means the performance of the complete floor may be lower than the performance suggested by the insulation material alone.
A carefully designed additional layer beneath the joists can sometimes reduce this effect by covering the timber members and creating a more continuous thermal barrier. However, the added layer must be compatible with the building’s moisture conditions and available clearance.
The decision should consider floor height, access, ventilation, fixing arrangements, and the risk of concealing timber that needs inspection. More insulation is useful only when the complete assembly remains safe and practical.
Finding and Sealing the Hidden Routes for Draughts
Draughts are often mistaken for poor insulation. In reality, a floor can have reasonable thermal resistance but still feel cold because outside air enters through small openings.
A complete floor insulation joist layering project should therefore include an inspection of the room-side air leakage paths. Sealing these routes can improve comfort and help the insulation perform as intended.
Floorboard Joints, Skirting Boards, and Service Penetrations
Traditional floorboards often have small gaps between their edges. Over time, timber movement can make these openings larger. Air may also enter through gaps around skirting boards, radiator pipes, and electrical service penetrations.
Suitable flexible fillers or draught-proofing strips can reduce unwanted airflow between boards. The product should be compatible with the floor finish and flexible enough to accommodate normal seasonal movement.
Where pipes pass through the floor, carefully fitted collars or appropriate sealants can close the openings. Large gaps may need a more substantial repair rather than a thin surface application.
Skirting boards should also be checked, especially along external walls. If the gap is behind the skirting, removing and refitting it with suitable sealing may provide a better result than applying filler only to the visible edge.
The goal is to reduce air movement from the subfloor into the occupied room. Sealing every visible opening without understanding what lies behind it is not a reliable strategy.
Separating Room Airtightness From Subfloor Ventilation
One of the most important distinctions in timber floor work is the difference between draught proofing the room and ventilating the void beneath it.
Air vents in external walls are often essential for cross-ventilation beneath suspended floors. They help remove moisture that could otherwise contribute to timber decay. Blocking them to make the room warmer can create a much more expensive problem.
The room-side floor can be made more airtight while the subfloor remains ventilated. This separation is central to a safe design.
Before installation, check that air bricks are open, not buried by landscaping, and not obstructed by debris. If the insulation arrangement affects airflow through sleeper walls or other openings, the ventilation strategy may need to be revised by a competent professional.
Reading Floor U-Values and Understanding Real Performance
A U-value measures how quickly heat passes through a building element. It is expressed in watts per square metre per kelvin, written as W/m²K. A lower U-value generally means better thermal performance because less heat passes through the element for a given temperature difference.
For homeowners planning floor insulation joist layering, U-values provide a way to compare complete floor constructions. They are more meaningful than simply comparing insulation thicknesses.
Why Insulation Thickness Alone Does Not Determine U-Value
Two floors can contain the same insulation thickness and still have different U-values. Their performance may vary because of insulation conductivity, joist dimensions, timber spacing, air gaps, perimeter details, and other construction layers.
For example, a floor with thick insulation fitted poorly may perform worse than a floor with a slightly thinner layer installed continuously and accurately. Gaps allow heat to bypass the insulation, while timber joists create repeating thermal bridges.
The floor’s boundary conditions also matter. A suspended floor over an exposed or ventilated void behaves differently from a floor above a heated room or a sheltered basement.
This is why a reliable calculation considers the whole assembly. It should include the insulation, timber members, surface layers, relevant air spaces, and the floor’s relationship with the surrounding ground and external environment.
How Joists, Edges, and Air Movement Influence Calculations
A U-value calculation for a timber floor should account for repeating elements such as joists and insulation-filled cavities. It may also need to consider junctions at external walls and other areas where the construction changes.
The effect of air leakage is not simply captured by the insulation’s declared thermal conductivity. A poorly sealed floor may feel uncomfortable even when its calculated U-value appears reasonable.
For UK projects, regulatory requirements depend on the building type, location, and nature of the work. England’s Approved Document L was updated in 2026, with the applicable edition depending on the relevant project and transitional arrangements. The correct requirement should therefore be checked rather than relying on an old figure copied from another project.
For context, the 2026 Ofgem ECO4 guidance describes suspended underfloor insulation using appropriately certified products and identifies a U-value of 0.25 W/m²K as a programme benchmark. That figure should not be treated as a universal legal requirement for every floor or property.
Ofgem
Keeping Moisture, Ventilation, and Timber Health in Balance
Insulation changes the way heat and moisture move through a floor. This can affect the drying conditions around joists, floorboards, and the subfloor void.
Timber can tolerate normal changes in humidity, but prolonged dampness increases the risk of decay. If insulation is installed over wet or damaged joists, the problem may become harder to detect and more expensive to repair.
Before work begins, identify the source of any moisture. It may come from leaking pipes, defective rainwater goods, ground moisture, poor drainage, or inadequate ventilation. Repairing the cause is more important than covering the affected area.
The existing air bricks should remain functional, and the subfloor should have an appropriate route for cross-ventilation. If a sleeper wall restricts airflow, the installation must not make that restriction worse.
Membranes require particular care. A vapour-open material may help manage wind washing while allowing some moisture movement, but it is not a universal solution. A vapour-control layer or impermeable membrane may be suitable in one designed assembly and harmful in another.
Historic England stresses that suspended floors require careful consideration of subfloor ventilation and moisture, and that floor insulation can change the building’s environmental behaviour. Older or heritage properties may therefore need specialist assessment before work proceeds.
Improving Existing Floors Without Creating New Problems
Retrofitting insulation into an existing floor is often more complicated than installing it in a new building. The structure may contain uneven joists, historic repairs, hidden services, and floorboards that have become fragile over time.
A thoughtful survey can prevent unnecessary disruption. It should establish the floor type, identify previous alterations, and confirm whether access from above or below is practical.
Working Around Uneven Boards and Older Building Details
Older floorboards may have irregular widths, uneven edges, and gaps caused by years of movement. Trying to force them into a perfectly uniform arrangement can damage the timber or create new openings.
Where boards need to be lifted, each should be labelled or photographed before removal. This makes it easier to return original boards to their correct locations and maintain the appearance of the room.
If the property has original timber features, consider whether the floor can be insulated from below. This may preserve the visible surface and avoid disturbing decorative finishes.
Some traditional buildings also use materials and construction methods that need to dry naturally. An insulation system designed for a modern house may not be suitable for an older property with different moisture characteristics.
Checking Services, Access, and Finished Floor Levels
Pipework and cables can complicate insulation installation. Pipes may need protection against freezing if they are moved into a colder part of the floor structure. Electrical installations should be checked to ensure that insulation does not create unsafe operating conditions or obstruct required access.
The finished floor level matters too. Adding layers above existing boards may affect doors, thresholds, skirting boards, stairs, and adjoining rooms. Even a small change in height can create awkward transitions.
When planning floor insulation joist layering, include these details before ordering materials. A design that fits neatly between the joists but creates problems at doorways or service connections is not a complete solution.
Expert Advice for a Reliable Floor Insulation Project
The best results come from treating the floor as a complete building system. Insulation, airtightness, ventilation, timber condition, and thermal bridging should be considered together.
An expert assessment should begin with the existing structure rather than a predetermined insulation product. The installer should confirm joist dimensions, inspect moisture conditions, identify ventilation routes, and check the available working space.
The insulation should be installed to the manufacturer’s specification. Batts should not be compressed to make them fit, rigid boards should be accurately cut, and all materials should have a suitable support arrangement. The perimeter and service openings should be addressed as part of the same design.
It is also sensible to photograph the work before the floor is closed. These records can show the insulation depth, support system, junction details, and any ventilation measures. They may be useful for future maintenance, building assessments, or energy performance documentation.
Energy Saving Trust advises that suspended timber floor insulation should only proceed when the joists are in good condition. It also highlights the importance of avoiding insulation gaps and maintaining suitable ventilation and moisture control.
Finally, avoid choosing a contractor on price alone. Ask how the proposed system deals with draughts, thermal bridges, and subfloor ventilation. A well-explained design is more reassuring than a promise that simply adding the thickest available insulation will solve every problem.
Conclusion
A warmer timber floor depends on more than filling the spaces between joists. The insulation layers must fit the structure, remain properly supported, and connect with the surrounding thermal envelope. Draught paths need attention, but essential subfloor ventilation must remain effective.
A well-designed floor insulation joist layering system balances these requirements. It can improve comfort, reduce unwanted heat loss, and help protect the timber structure for the long term. Accurate U-value calculations and careful installation make it easier to understand what the finished floor can realistically achieve.
The most reliable approach begins with a proper inspection, follows the building’s moisture and ventilation needs, and treats every layer as part of one connected system.