A cold floor can change the way an entire room feels. You may have efficient heating, comfortable furniture, and well-sealed windows, yet still notice an uncomfortable chill around your feet. In many homes, the ground floor is part of the reason. Heat can escape through an uninsulated floor, while small gaps and poorly managed draughts make rooms feel colder than they need to be.
A successful insulation project involves much more than placing boards or rolls beneath a floor. The construction must be assessed, the correct insulation selected, and moisture, ventilation, and thermal gaps carefully managed. The best steps ground floor insulation projects follow a clear process from the first inspection to the final floor finish.
The right method depends on whether the property has a suspended timber floor, a solid concrete floor, or an older traditional construction. Each type has different requirements. A solution that works well in a modern concrete home may create moisture problems in an older timber property.
Good planning helps avoid expensive mistakes. It can improve indoor comfort, reduce unwanted heat loss, and support more efficient heating. This guide explains the essential stages, practical considerations, and professional advice that help produce a durable ground floor insulation build.
Understand the Existing Floor Before Choosing Insulation
The first stage is identifying exactly how the ground floor has been constructed. Never select insulation based only on the appearance of the floor covering. Carpet, laminate, tiles, and timber boards can hide very different structures underneath.
A suspended timber floor usually consists of floorboards supported by joists, with a ventilated void beneath. Air bricks or ventilation openings along the external walls can be a useful clue. A solid floor, by comparison, is generally made from concrete or another dense material laid over the ground, often with a screed and finished surface above it.
Some older properties contain stone flags, lime-based floors, or mixed construction. These require particular care because traditional materials often manage moisture differently from modern concrete systems. Historic England warns that insulation choices in traditional buildings should take account of the original floor fabric and the possibility of trapping moisture.
The inspection should establish the floor type, current insulation, available installation depth, condition of supporting materials, and access to any void beneath the floor. It should also identify pipes, cables, vents, and other services that may affect the design.
For example, a homeowner planning to insulate a Victorian living room may discover that the floorboards sit above a damp subfloor void. Installing insulation immediately would be a poor decision. The moisture source and ventilation would need to be assessed first.
These initial steps ground floor insulation work around the building rather than forcing the building to fit a product. That distinction is essential for a reliable result.
Inspect for Dampness, Rot, and Structural Damage
Insulation should never be used to hide an existing building problem. Before installation begins, inspect the floor and surrounding structure for water damage, timber decay, cracks, and signs of persistent dampness.
In suspended timber floors, check the joists, supporting beams, floorboards, and their connections. Look for soft or discoloured wood, fungal growth, musty smells, and areas that feel unusually weak. Timber affected by wet rot or other decay should be assessed and repaired before insulation is fitted.
The space below the floor matters just as much. Standing water, blocked air bricks, damaged drainage, and soil that remains persistently wet can create conditions that threaten the timber structure. A professional should investigate the cause rather than simply covering the affected area.
Solid floors need a different assessment. Look for visible damp patches, damaged screed, loose tiles, cracks, and signs of moisture entering from the ground or surrounding walls. Existing damp-proofing arrangements should be understood before adding new layers.
This inspection is one of the most important steps ground floor insulation because insulation changes the temperature and moisture behaviour of a floor. If a construction already has a moisture problem, an unsuitable new layer may make it worse.
Do not assume that every stain means a serious defect. However, unexplained dampness, recurring mould, or deteriorating structural materials deserve professional attention. Correcting the cause before covering the floor is far less disruptive than removing a newly installed system later.
Select the Right Insulation for the Floor Construction
Once the floor has been assessed, choose a material that suits its construction, moisture conditions, available depth, and intended use. There is no single insulation product that works equally well in every building.
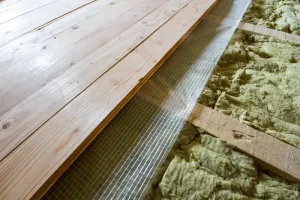
For suspended timber floors, mineral wool is commonly used between joists. It can fit around irregularities and services when installed correctly. Rigid insulation boards may also be suitable in some designs, provided they are cut accurately and supported as required. The system must maintain the intended ventilation and moisture control below the floor.
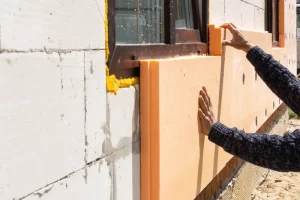
For solid concrete floors, rigid insulation boards are often used because they can support the floor build-up when specified for that purpose. Depending on the project, insulation may be installed above the existing slab or beneath a new slab or screed. The choice affects floor height, thresholds, doors, and the relationship with adjoining rooms.
Older stone or lime-based floors need a more sensitive approach. A non-permeable product placed in the wrong position can interfere with the way moisture moves through traditional materials. A specialist familiar with traditional buildings should assess suitable options before work begins.
Material selection should consider thermal conductivity, thickness, compressive strength where relevant, fire performance, moisture characteristics, and compatibility with the rest of the floor system. The advertised performance of an insulation product does not guarantee the same result after installation. Gaps, compression, and poorly detailed edges can reduce real-world performance.
The best steps ground floor insulation approach is to choose the complete system, not just the insulation material. Underlay, membranes, vapour-control layers, support netting, screed, and floor finishes must work together as designed.
Plan the Insulation Thickness and Finished Floor Level
Insulation thickness has a direct effect on thermal performance, but adding the thickest available product is not always the best solution. The design must account for the floor’s existing construction and the space available above or below it.
With a solid floor, adding insulation above an existing concrete slab raises the finished floor level. This can affect door clearances, skirting boards, stair risers, kitchen units, and the transition between rooms. Even a relatively small increase can create awkward details if the adjoining floor is left unchanged.
A suspended timber floor presents different challenges. The depth between joists may limit the amount of insulation that can be fitted. Insulation should not be compressed simply to force a thicker product into a shallow space. Compression can reduce its effectiveness and may interfere with the intended installation.
Thermal performance is commonly described using a U-value. It measures how quickly heat passes through a building element. A lower U-value indicates better insulation performance. The appropriate target depends on the building, the work being carried out, and the local regulations. England’s 2026 edition of Approved Document L provides current energy-efficiency guidance for applicable building work, including considerations for existing dwellings. It should not be treated as a universal standard for other countries or every type of renovation.
A competent designer or installer can calculate the proposed floor build-up and assess practical constraints. These steps ground floor insulation planning around actual dimensions help prevent problems that might otherwise appear only after the new floor has been installed.
Protect Ventilation and Control Moisture Properly
Ventilation is especially important in properties with suspended timber floors. The void beneath the floor often relies on air movement through external air bricks or other designed openings. This movement helps moisture disperse and reduces the risk of damp conditions around the joists and floorboards.
Never block air bricks with insulation, soil, paving, or landscaping. Check that openings remain clear and that air can travel through the intended subfloor space. If the property has been extended or its external ground level has changed, the original ventilation route may have been restricted. This should be corrected as part of the project design.
Insulation should also be installed so that it does not sag, leave large gaps, or obstruct necessary airflow. In a suspended timber floor, installers may use suitable netting or support systems to hold insulation securely between the joists. The exact detail depends on the product and the floor design.
Moisture control in solid floors requires a separate strategy. The design may include a damp-proof membrane or another specified moisture-control layer. Its position, continuity, and connection with surrounding construction are important. A membrane that is punctured or poorly joined may fail to provide the intended protection.
Older buildings require additional judgement. Traditional stone and lime floors may need to remain vapour-permeable so moisture can move through the construction safely. Historic Environment Scotland highlights the importance of maintaining moisture movement and reliable subfloor ventilation when upgrading traditional buildings.
These steps ground floor insulation designs around moisture behaviour, not just heat retention. A warm floor is useful, but not if the installation encourages decay, condensation, or dampness elsewhere.
Prepare the Floor and Surrounding Areas for Installation
Good preparation makes installation more accurate and reduces delays. Before work starts, remove floor coverings and inspect the exposed surface. In a suspended timber property, floorboards may need to be lifted carefully to provide access. Where access is available from a cellar or crawl space, installation from below may reduce disruption to the room.
Clear away loose debris and identify pipes, cables, ducts, and other services. Any electrical work or changes to plumbing should be planned with the appropriate qualified tradesperson. Do not cover junctions or components that require inspection or access.
For solid floors, preparation may involve removing skirting boards, floor finishes, or damaged screed. The existing slab should be checked for stability and moisture conditions. Any necessary repairs should be completed before the insulation layer is placed.
The installation area should be measured accurately. Irregular corners, doorways, pipe penetrations, and wall edges need particular attention. Insulation boards should be cut to fit without leaving unnecessary spaces. With flexible insulation, the material should fill the intended cavity without being crushed or left loose.
Homeowners should also plan how furniture, appliances, and household activities will be managed during the work. A kitchen or hallway project may require temporary access arrangements, while a whole-ground-floor renovation could involve several stages.
Thorough preparation is among the most practical steps ground floor insulation because it allows installers to work safely and gives the finished system a more reliable foundation.
Install the Insulation With Continuous Coverage
The installation method depends on the floor type, but one principle applies to both timber and solid constructions: the insulation layer should be continuous and fitted according to the manufacturer’s instructions and the approved design.
For suspended timber floors, insulation is generally fitted between the joists. It must be supported securely and positioned without damaging the timber or blocking ventilation routes. The installer should pay attention to the edges where the floor meets external walls. Poorly fitted insulation around the perimeter can leave cold areas and allow unwanted air movement.
For solid floors, rigid boards are laid in the specified arrangement over or beneath the concrete structure. Boards should fit closely, with joints treated according to the system requirements. The floor build-up may also include a damp-proof layer, separating membrane, screed, or load-distributing layer. These components should not be added or removed casually because each has a specific function.
Thermal bridging deserves attention during this stage. A thermal bridge is a section of construction where heat can pass more easily than through the surrounding insulated area. It may occur at floor edges, wall junctions, thresholds, or around structural elements. Poor detailing in these areas can reduce the benefit of an otherwise well-insulated floor.
A common example is a room where insulation covers the main floor area but stops short at the perimeter. The centre of the room may feel warmer, while the edges remain cold. Correct junction detailing helps reduce this uneven performance.
The essential steps ground floor insulation installation process also includes checking that boards, rolls, membranes, and support materials remain in good condition as work progresses. Damaged products should be replaced rather than hidden beneath the finished surface.
Coordinate Services, Underfloor Heating, and Floor Finishes
Ground floor insulation work often takes place alongside other improvements. This can include replacing plumbing, updating electrical services, installing underfloor heating, or changing the floor finish. Coordinating these elements early avoids unnecessary rework.
Underfloor heating needs a compatible insulation design. Without suitable insulation below the heating system, some heat may travel downwards instead of being directed into the room. The system designer should specify the insulation, heating components, screed or overlay, controls, and floor finish as one coordinated build-up.
Floor finishes also have different requirements. Tiles need a stable base and suitable adhesive system. Timber and laminate products may require particular moisture conditions and underlays. Carpet can improve the feeling of warmth underfoot, but it does not replace proper structural floor insulation.
Service routes should be planned before the insulation is closed in. Pipes and cables must be installed and protected according to applicable standards. Where future access may be needed, the design should avoid permanently concealing components that require maintenance.
Before screed is poured or floorboards are replaced, inspect the work carefully. Photograph hidden layers and service routes. This creates a useful record for future repairs, alterations, and property documentation.
These steps ground floor insulation projects with other building work in a coordinated way. The result is less likely to involve avoidable clashes between heating pipes, floor levels, insulation thickness, and final finishes.
Check Quality, Safety, and Building Regulation Requirements
A completed floor may look neat while containing hidden installation defects. Quality checks should therefore take place before the insulation is covered. Confirm that the specified product and thickness have been used, joints are properly fitted, support is secure, and moisture-control details are continuous where required.
For suspended floors, verify that the subfloor ventilation remains open and that insulation has not been pushed against unsuitable damp surfaces. Check that joists and floorboards are sound and that the floor feels stable after reinstatement. For solid floors, confirm that the insulation and membrane arrangement matches the design and that the finished levels are correct.
Safety must be considered throughout the work. Older properties may contain hazardous materials, and lifting floors can expose hidden services or damaged components. Suspected asbestos-containing materials should not be disturbed. Specialist assessment is necessary where there is uncertainty. Electrical, gas, and structural work should be handled by appropriately qualified professionals.
Building regulations differ by location and by the nature of the project. Some work may require approval, inspection, or compliance documentation. In England, the relevant edition of Approved Document L depends on the building work and the applicable transitional arrangements. Homeowners elsewhere should check their own local requirements rather than relying on English guidance.
The government-backed best-practice guidance for suspended timber floor insulation is also useful for understanding the specific risks and installation considerations involved in retrofitting this type of floor.
A final inspection, product information, installer details, invoices, and installation photographs should be kept together. These records make it easier to demonstrate what has been done and help future contractors understand the hidden construction.
Expert Advice for a Durable Ground Floor Insulation Build
Experienced installers focus on the whole floor system rather than treating insulation as an isolated product. Their first priority is to understand the building, identify moisture risks, and select a suitable method. This is particularly important in older homes, where an apparently simple upgrade can affect ventilation and the movement of moisture through traditional materials.
Do not choose a product based on thickness or price alone. Compare its thermal performance, intended application, fire characteristics, moisture behaviour, and compatibility with the proposed floor finish. Ask the installer to explain how the floor edges, service penetrations, and junctions with external walls will be handled.
It is also sensible to request a written specification before work begins. It should identify the insulation type, thickness, installation position, moisture-control details, expected finished floor height, and any ventilation changes. A clear specification makes it easier to compare quotations and understand exactly what is included.
Energy Saving Trust advises that floor insulation needs careful installation, adequate ventilation, moisture control, and close-fitting insulation without gaps. It also recommends seeking professional help when the floor type or installation method is uncertain.
The most reliable steps ground floor insulation projects combine sound building knowledge with careful workmanship. Rushing the inspection or cutting corners around the edges may reduce the value of the entire upgrade. Taking time to plan correctly is usually more economical than repairing hidden damage later.
Conclusion
A successful ground floor insulation project begins with understanding the existing construction. From there, the homeowner or installer can assess moisture and structural conditions, choose suitable materials, plan floor levels, protect ventilation, and install a continuous insulation layer. Final checks and accurate documentation complete the process.
The most important steps ground floor insulation work are not simply about adding material beneath a floor. They are about creating a compatible building system that manages heat, air, and moisture together. When each stage is handled carefully, the result can make rooms more comfortable and help reduce unnecessary heat loss for years to come.