Every winter, the same scene plays out in countless homes. The heating is on, the radiators are warm, and yet your feet are freezing. You pull on thicker socks, buy a rug, and turn the thermostat up another degree. The room still feels like it has a chill rising from below.
That chill is not your imagination. It is heat escaping through the floor and cold air creeping in underneath. The good news is that this problem is fixable, and the fix is often simpler and cheaper than people expect. This guide walks through the main flooring insulation materials, what they can realistically save you, and how to prepare the space under your floor so the work lasts. Think of it as a conversation with a patient contractor who wants you to get it right the first time.
Why Cold Floors Cost You More Than Comfort
Heat moves from warm to cold, always. When the space below your floor is a cold crawl space, a damp void, or bare ground, your living room becomes the warm side, and the heat keeps leaving. Unsealed gaps between floorboards make it worse by letting drafts rise through the house.
How much heat disappears varies by home type. In older homes, up to 10 percent of heat can be lost through the floor, and suspended timber floors above a void tend to lose more than modern slab floors. Other industry sources cite higher figures for ground floors, up to around 30 percent, so treat any single number as a range rather than a fact. What matters is that your floor is a real contributor, not a footnote.
The impact shows in comfort as much as in bills. A cold floor makes the whole room feel colder because your body loses heat to it directly. You then raise the thermostat to compensate, which wastes energy. Insulating the floor creates a warm surface underfoot, reduces drafts, and lets the heating work less hard. It also helps with moisture control, since a warmer floor is less likely to collect condensation. For households with children, older adults, or anyone who spends hours sitting at a desk, that difference is felt every single day.
Flooring Insulation Materials Compared: What Works Best
Choosing the right product is the heart of the job. Flooring insulation materials differ in cost, thickness, moisture behavior, and installation style, and the best choice depends on your floor type and your budget. All of them are judged by R-value, a rating of resistance to heat flow. The higher the R-value, the more effective the insulation. In the UK, you will often see U-value instead, which measures heat loss, so lower is better there.
Mineral Wool and Fiberglass Batts
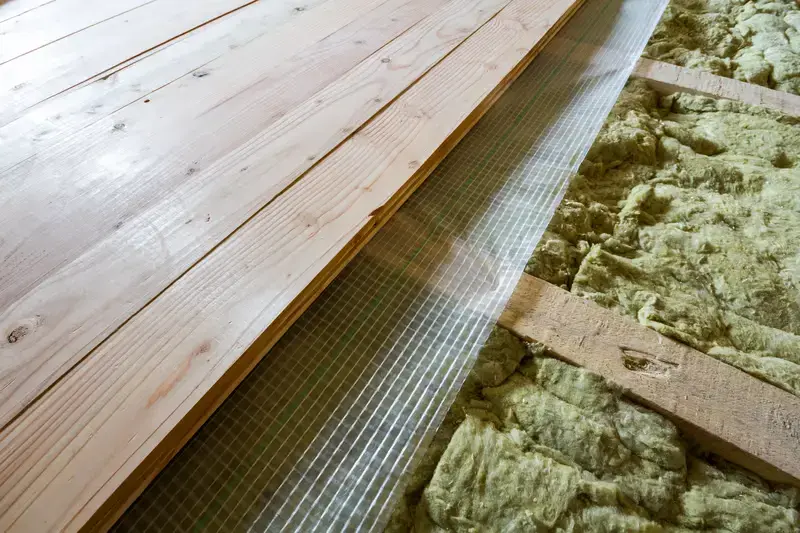
Batts and rolls are the classic option for suspended timber floors. They fit snugly between joists, they are affordable, and many are made from recycled content. Mineral wool, also called rock or stone wool, is dense, fire resistant, and good at damping sound. Fiberglass is lighter and cheaper but needs more care in handling, because the fibers irritate skin and lungs.
The big caution is moisture. Batts lose performance when damp, so they need a dry void, good ventilation, and a breathable support layer to stop them sagging. In a clean, dry crawl space, a well-fitted batt can be a very cost-effective choice. In a damp one, it is usually the wrong product until the moisture issue is solved.
Rigid Foam Boards: EPS, XPS, and Polyiso
Rigid boards pack more insulation into less thickness, which makes them a favorite for concrete floors and for situations where headroom is tight. Expanded polystyrene is the least expensive option and offers about R-4 per inch, while extruded polystyrene sits in the middle at about R-5 per inch. Polyisocyanurate, often called polyiso, typically offers an even higher rating per inch, though its performance can drop in very cold conditions.
Boards are resistant to moisture, easy to cut, and do not sag. They work well above a concrete slab, with a floating floor laid on top, and between or under joists when cut carefully and sealed at the edges. Gaps matter, because even small ones let heat bypass the board, so use foam sealant or tape at the joints. Check fire and ventilation rules in your area, since some foams need a protective covering in certain locations.
Spray Foam, Reflective Foil, and Natural Options
Spray foam seals and insulates in one step. Closed-cell foam resists moisture and adds rigidity, and it fills awkward shapes that boards and batts struggle with. The drawbacks are cost and the need for a trained installer. Spray foam is also hard to remove later, so be certain before you commit.
Reflective or multi-foil insulation works differently. In areas like joist spaces above an unheated basement, warm air tends to stay near the floor, so radiation becomes the main route for heat loss, and a reflective barrier can cut that loss effectively. The same source notes that it does little against conduction and convection, so it works best as part of a system. Thin and light, it suits tight spaces.
Natural materials such as sheep’s wool, wood fiber, and cork appeal to homeowners who want low-impact, breathable products. They handle moisture swings well and feel pleasant to work with, though they usually cost more. If your priority is a healthy, breathable build, these flooring insulation materials are worth a serious look.
Real Energy Savings: What the Numbers Say
Everyone wants to know the payback. The honest answer is that savings depend on your climate, your floor type, your heating system, and what you have now. In older UK houses, typical estimates from the Energy Saving Trust run from about £30 a year for a terraced home to about £75 for a detached one. Another estimate puts the saving for a semi-detached house near £70 per year. These are modest on paper, but they reflect a one-off job that can last decades.
Results can be larger in poorly insulated homes. In a case study of 100 UK properties, a robotic underfloor spray system averaged annual savings of £151, with some homes saving up to £665. Those figures come from the manufacturer’s own report, so view them as encouraging evidence rather than a guarantee. The same study reported a 76 percent drop in heat loss through the floor and a roughly 27 percent reduction in cold drafts, which is the part homeowners notice first.
Payback varies too. Suspended timber floors are generally the easiest to insulate, with the Energy Saving Trust suggesting a return on investment within three to five years. Slab floors tend to cost more per unit of benefit, especially if the covering has to be lifted. The smart approach is to treat floor insulation as part of a package. Combined with loft and wall upgrades, draught-proofing, and an efficient heating system, the savings multiply and comfort improves everywhere.
In US climates, targets differ. Energy Star-style guidance, as summarized by building suppliers, suggests roughly R-13 for floors in the warmest zones, around R-25 in the middle zones, and R-25 to R-30 in colder regions. Always confirm local code and your climate zone before you buy.
Matching Material to Your Floor Type
Floors come in three broad types, and each calls for a different approach. Suspended timber floors sit above a ventilated void and are the most straightforward. Insulation goes between the joists, supported by netting, battens, or breathable membrane, and the void must stay ventilated. Never block air bricks, because trapped moisture can rot timber.
Concrete slab floors are denser and lose less heat, but they can feel cold and clammy. Insulating them usually means adding a layer of solid insulation directly on top of the slab. That raises floor height, so doors, thresholds, and stairs may need adjusting. Rigid boards with a screed or floating floor on top are the common solution. If you are building new or taking up the slab anyway, insulation below the slab gives the best result.
Floors above unheated spaces, such as garages, crawl spaces, and basements, are often the biggest hidden culprit. A cold garage under a bedroom can make the room feel permanently chilly. Insulating the underside of the floor with batts, boards, or spray foam, along with sealing air leaks, can make a dramatic difference. Check each case for moisture, pipework, and fire requirements before you start.
Underfloor Prep: The Step That Decides Success
Here is a truth that contractors repeat constantly: the best flooring insulation materials fail if the space under the floor is not ready. Preparation is where most projects succeed or fail, and it deserves more attention than the product itself.
Start with moisture. Look for damp patches, mold, standing water, rotten timber, or musty smells. Fix leaks, improve drainage, and address ventilation before you insulate. Trapping insulation against damp timber is a recipe for decay. In a crawl space, a ground cover or vapor barrier can reduce moisture rising from the soil, and in some regions an encapsulated, conditioned crawl space is a better strategy than a ventilated one. Local conditions and building codes decide which approach is right.
Next, seal air leaks. Insulation slows heat flow, but it does not stop moving air, so gaps around pipes, cables, and floorboards should be sealed first. Use appropriate sealant or tape, and keep ventilation openings clear where they are required. Check for pests and remove debris. Inspect joists for rot or damage, and repair what you find.
Then think about services. Water pipes in an insulated void can freeze if they sit outside the insulation layer, so either insulate the pipes separately or place the floor insulation to keep them within the warm side. Be careful around electrical wiring, gas lines, and recessed lights. Do not bury junction boxes, and keep the required clearance around heat sources such as flues and flue liners. If you suspect old materials containing asbestos, particularly in homes from before the 1990s, stop and get a professional assessment.
Finally, measure accurately. Joist spacing, void depth, and access routes all influence the product you can use. Cut insulation snugly, without compressing it, because squashed material loses R-value. Wear protective gear such as gloves, a respirator, eye protection, and coveralls, and work with a partner when you crawl into confined spaces.
Costs, Payback, and DIY or Professional
Budget varies widely by region, product, and access. Batts and rigid boards are generally affordable for a handy homeowner, while spray foam and robotic systems carry higher prices because of equipment and training. As a rough illustration, one UK source lists rigid foam at about £5 to £15 per square metre and multi-foil from about £7 per square metre for the material alone. Labor, waste disposal, and repairs come on top, so get at least two written quotes for professional work.
DIY is realistic for accessible suspended timber floors with decent headroom and no moisture issues. You will need patience, safety equipment, and a willingness to crawl into tight spaces. Hire a professional when access is difficult, when moisture or structural problems appear, or when you want spray foam or specialist systems. Check for grants too. In the UK, schemes such as the Great British Insulation Scheme and the Energy Company Obligation have supported underfloor work for eligible households, and similar incentives exist in many countries. Rules change, so confirm eligibility before you start.
Expert Advice From Installers and Energy Assessors
People who insulate floors for a living tend to repeat the same lessons. First, deal with moisture before anything else. A dry void is the foundation of a long-lasting job. Second, close the gaps. Air leakage can undo a large portion of your insulation’s value, so take time with sealing. Third, choose the right product for the place. A cheap batt in a wet crawl space can fail, while closed-cell foam in a dry, accessible void might be overkill.
Fourth, aim for continuity. Insulation works best when it forms an unbroken layer, so avoid leaving gaps at edges, around pipes, or between boards. Fifth, do not block required ventilation, and do not forget fire safety. Sixth, think about the whole home. Floor insulation is excellent, but pairing it with loft insulation, wall improvements, and a well-sized heating system creates a better result than any single measure alone.
Finally, ask for proof. A reputable installer should explain the product, the R-value or U-value achieved, the ventilation plan, and the guarantee. Take photos before, during, and after the work. If you are ever unsure about structural or moisture issues, a surveyor or an energy assessor can give an independent opinion for a modest fee. Spending a little on advice often saves a lot on mistakes.
Final Thought
A warm floor is one of those quiet luxuries that changes how a home feels. You stop thinking about cold toes, drafts stop whispering across the room, and the heating no longer works so hard to win an unfair fight. The right flooring insulation materials, chosen to suit your floor and installed over a dry, sealed, well-prepared space, can deliver that comfort for decades.
Start small if you need to. Look under your floor, check for moisture, and measure the space. Then choose a product that fits your budget and your home, and either tackle the job carefully or hire someone you trust. Your feet, your bills, and your home will thank you the very first cold morning.